Installation Instructions for M6-B and M6-Sa
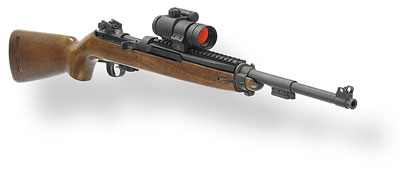
UltiMAK M6 Optic Mount
for U.S. Carbine, Caliber .30, M1
Courtesy of UltiMAK Enhanced Performance
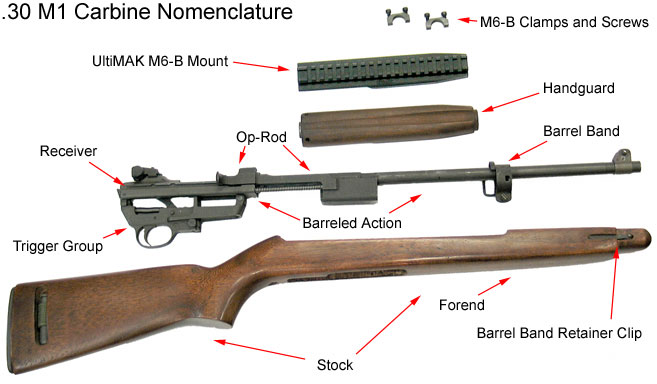
These instructions show a G.I. pattern Carbine. Those manufactured under the name “Universal” will not be compatible with the UltiMAK M6-B Optic mount. The newer production IMI and IAI carbines, as well as the current production Auto Ordinance carbines are close enough to “G.I. Pattern” that they are compatible with the M6-B mount. Several UltiMAK customers have sold or traded their Universal, and some Plainfield, carbines for GI pattern carbines, so as to take advantage of the substantial benefits of the UltiMAK system.
Also included are the “The Rules” — four simple rules that will prevent virtually all firearm accidents.
So as to get this right the first time and avoid frustration, please read these instructions completely before beginning. Then read back through each step as you work.
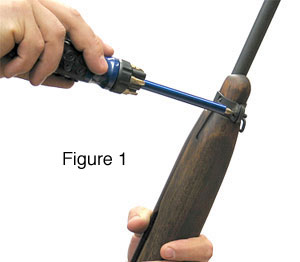
A. Remove magazine, clear the chamber, and keep all ammunition away from your work area. Loosen barrel band screw (figure 1).
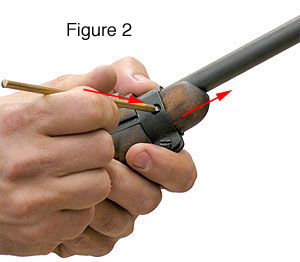
B. Using a brass punch or other non-marring punch, push inward on retainer clip and slide barrel band forward (figure 2).
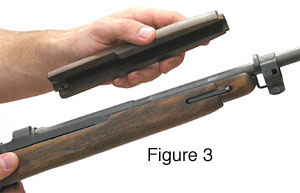
C. Slide handguard forward and remove it (figure 3).
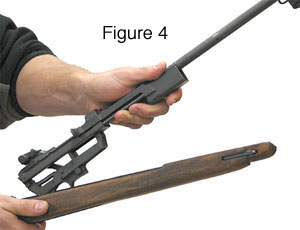
D. Remove barreled action from stock by tilting the muzzle upward, lifting the action out of the stock (figure 4). On models having a cross bolt (push button) trigger safety, you may need to place the safety in a half way position, to clear the stock.
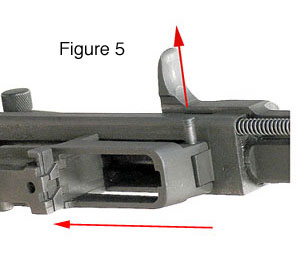
There is a retaining pin that holds the trigger group onto the receiver. On some carbines, this pin can easily fall out. To avoid dropping this pin and the trigger group you can remove the pin and slide the trigger group back to remove the trigger group (figure 5).
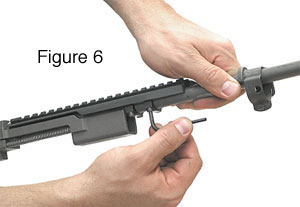
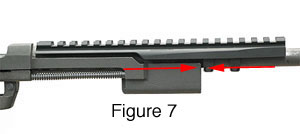
E. Place the M6 mount over the barrel, so that the back of the mount is close to the front of the receiver, push the two clamps onto the barrel and start all four clamp screws. You may use a very small amount of liquid thread locking product if you wish, but all our testing has been done without it, and no loosening has been observed. Keep in mind that there should be a gap between the bottom of the mount and the top of the clamps, and this gap should be about the same on either side of each clamp. Tighten one of the clamps to the point where you can just move the mount around slightly with a little effort (figure 6). You should be able to position the M6 mount and have it stay where you put it until you can further tighten the screws. Keep in mind that there must be a gap between the op-rod and the rear clamp when the op-rod is all the way forward (figure 7).
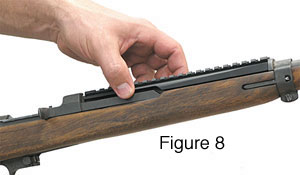
F. Now place the barreled action back into the stock, and slide the barrel band into its locked position. You may have to move the M6 mount back to allow room for the barrel band. Position the mount square and level with the receiver and stock (figure 8). The M6 mount should NOT be touching either the barrel band or the receiver. There should also be a gap between the stock and the mount that is about equal on either side. The mount’s cantilevered design needs only to clamp to the barrel and touch no other part of the rifle.
Some Carbine stocks will need to have some material removed from inside the forend, to allow room for the M6 clamps (figure 9). The old G.I. stocks that we’ve seen have fit with no modification, though there are some rare exceptions. The newer IAI and IMI stocks, the Auto Ordnance and the new Inland Manufacturing stocks, and some synthetic stocks, WILL need to be modified. A router or Dremel tool will work well for this, as will a set of nice, sharp carving chisels, assuming you’re reasonably handy with such tools. The stock at right in figure 9 is an original G.I. Winchester, and will fit without modification. The one at left in the photo is a newer IAI stock that has been routed out to make room for the M6 clamps. Be sure to avoid cutting into the barrel band retainer clip, which passes all the way through the forend, right-to-left, just in front of where you’ll be cutting. Removing the clip during the cutting operation is probably a good idea. The clip can be pushed out toward the right using a pin punch.

G. Once the mount is positioned, remove the stock again and tighten the clamp screws good and tight. Be very careful to tighten only a small amount on each screw at a time. Tighten the screws on one clamp first. Tighten each screw less than a quarter turn at a time, alternating tightening one side then the other. Repeat this process for the screws on the other clamp. This will help avoid pulling the mount over to one side as the screws are tightened. Get the screws good and tight.
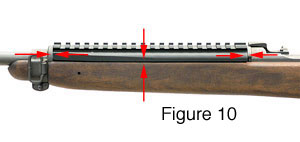
H. If you have removed the trigger group, reinstall it along with the trigger group retaining pin. Reinstall the barreled action into the stock and snap the barrel band into place. Check to be sure the M6 mount is not touching the barrel band, the receiver, or the stock (figure 10). Tighten the barrel band screw (figure 1).
I. Install a good optic and go shooting. Enjoy your work. Clean the bore and bolt, take up some ammo and head to the range. Remember; The .30 Carbine in good condition is generally underestimated in terms of accuracy. Nearly all rifles shoot more accurately than their owners.
Tip: Never use bare lead bullets in your Carbine. Though they may feed and function great for a while, each lead bullet will leave a tiny shaving of lead in the gas channel. Eventually, the gas piston will jam on the lead shavings, rendering your Carbine inoperable. The only cure is to completely strip the Carbine, remove the piston, and clean out all the lead. It can be dangerous too: Since the jammed piston will not allow the op rod all the way forward, it could result in a cartridge firing “out of battery” (firing with the bolt lock lugs only partially engaged with the receiver). Use only jacketed bullets, as the Carbine was designed for them. JPHs (jacketed hollow points) or softpoints will be fine as long as they feed reliably and leave no lead exposed to the bore surfaces. In fact, HP and SP bullets typically have solid copper bases, as the lead is inserted from the nose, i.e. there is no lead exposed to combustion, which is much better. Same goes for the TMJ (Totally Metal Jacketed) Speer bullets. One of our high volume test Carbines ended up with the piston jammed on lead dross, from regular FMJ ammunition, just from the exposed lead at the bullet base. It was thus rendered completely inoperable. The lead dross is rock hard and extremely difficult to remove. Solid copper base, HP, SP or TMJ bullets would prevent this problem.
Remember “The Rules” too:
1. Always keep the gun pointed in a safe direction.
2. Always keep your finger off the trigger (we like to say “out of the trigger guard”) until you’re ready to shoot.
3. Always keep the gun unloaded until ready to use.
4. Know your target and what is beyond it (the .30 Carbine delivers more energy than a typical .357 magnum round fired from a handgun).
The first three rules are standard NRA rules and will serve you well. We add the fourth, which comes from Cooper, as a way to help you think about your shooting situations in the field.
You can spot an inexperienced and/or undisciplined shooter a block away, because among other things, you’ll see the trigger finger go right onto the trigger as soon as the rifle is in the hands (see rule 2 above).